Sunday, October 31, 2010

EXP 2: Week 7: Research Continued...

Entity Rotation Fall Through Problem:
Upon further implementation of my porosity lens concept and testing I discovered that when an basic physics entity is rotated the enabling of collisions is disabled, thus one falls right through when walking on the surface. However after discussing the issue with a friend he suggested I try implementing a small physics impulse to reset the physics upon each frame. Furthermore after posting it within the forum, Russell suggested that rather using a basic physics entity I rather use a Geometric Entity. Upon testing this I discovered that this was the best solution due to the simplicity of it, as it allowed me to walk over any surface of the rotated entity. However due to time constraints I was unable to go through the long process of switching all 27 components to geometric entities before re positioning them, so rather I decided to portray my porosity lens through AI’s. This proved to work very well from an external filming point of view as well as first person due to the manner in which particular AI expressions are rather depressed, enhancing the persona of my documentary with reference to my porosity lens brief.

Camera Attachment to Protagonist:

Through previous camera research I discovered the manner in which one is able to control a camera using the flow graph to present the view in game mode, while I wished to further learn how to attach the camera’s view to a moving person. I discovered this through research, as all you need to do is set up the camera within track view as normal but with only one position set, ensuring the track view’s length runs for as long as you wish to record. From here you create the normal flow graph, adding the usual Entity: AttachChild set up to attach the camera to either the local player or an AI. Such is outlined below.

AI Path Experimentation:

In the discussion of using AI’s to portray my porosity lens documentary I realised that I would be required to learn how to operate AI paths which I was able to do so through some research. Simply one creates a path ensuring the snap to terrain is set, outlining the path before placing the AI you wish to have walk along it at the beginning. One should note that for such to work the AI paths ‘road’ setting must be turned off. From here you simply use the following flow graph to attach the AI to the path setting a trigger. I also discovered that I needed to refresh and generate AI navigations before running it to ensure it works.

EXP 2: Week 6: Research Continued...

Entity Rotation of 360 Degrees – Version Two:

Upon discussing my mastery videos with a tutor he noticed the method of 360 degree rotation that I was using and suggested I use a much simpler method as present below. Rather than performing the rotation in two phases with a time delay, rather Interpol a single degree every fame to the entities position through a key input. This worked perfectly as I was beginning to have issues with my own method as it would only work on two axis. However the new method required a lot more processing putting a large amount of pressure on the CPU slightly slowing down the level. However I remained to incorporate this method in the final mastery demonstration video. I have provided the flow graph below.

Track view Camera Management:

As I further begin to consider the final presentation of my porosity lens I am questioning whether to film the documentary externally or from first person. After considering this further I decided that part will be filmed externally and thus required me to learn how to do track view cameras. After researching this I discovered that it was simple and only involved the formation of a normal track view with an added ‘scene node’ line before creating a simple flow graph as outlined below. However due to the smooth motion capabilities of the camera I have decided to attempt to further attach the camera to the local player to present different perspectives. I have been unable to achieve this of yet, but will continue researching this into the future.

Entity Attachment and Detachment Experimentation Six:

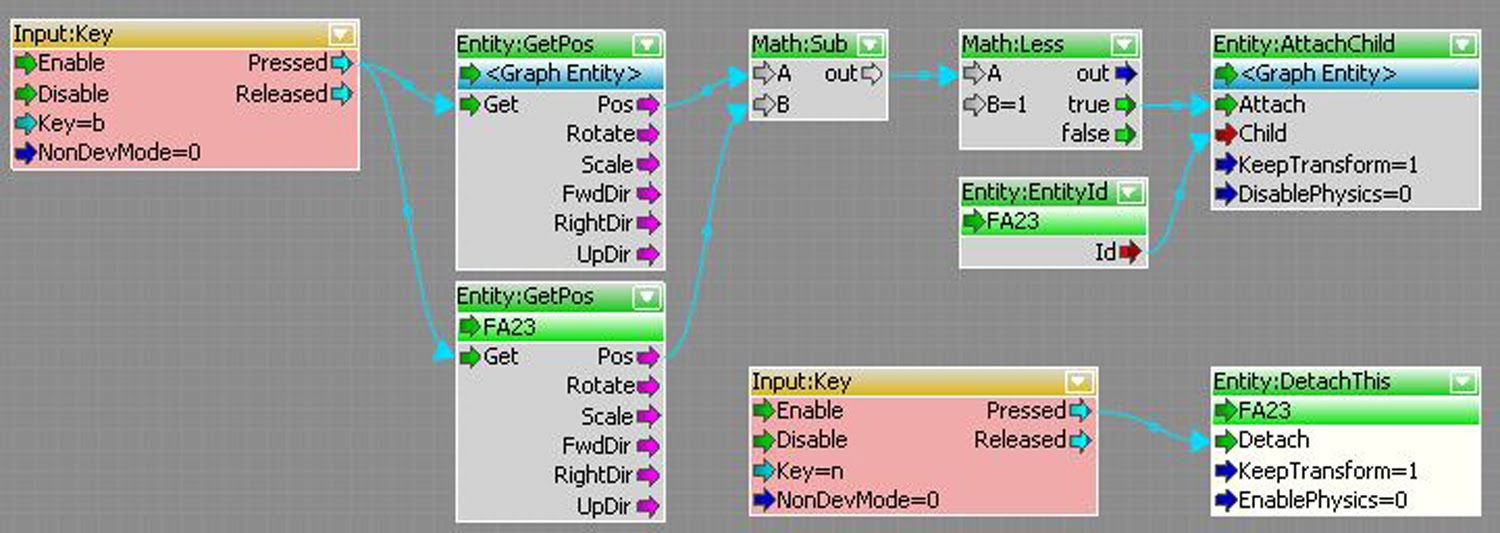
In terms of achieving my porosity lens I started to become very doubtful this week as to whether the attachment and detachment would even be possible to correctly manage due to the many attempted and failed experimentations I had carried out. However thankfully Vinh this week provided what he thought to be the solution. It was a very bold concept which we both believed would solve all problems. He proposed having an invisible skeleton with a parent centre point and then 8 children points which would move together around the faces of the cubes through a ‘mouse’ node available through the plug-in system. Further, each of the children points would test to determine whether a the skeletons child point is at the same point of the cube beneath it, if the subtraction of positions equalled zero it would attach (however through further testing by myself this equal was replaced with a less then 1). If the resultant was false it would remain detached. The conceptual sketch is included below to as how this system would work.


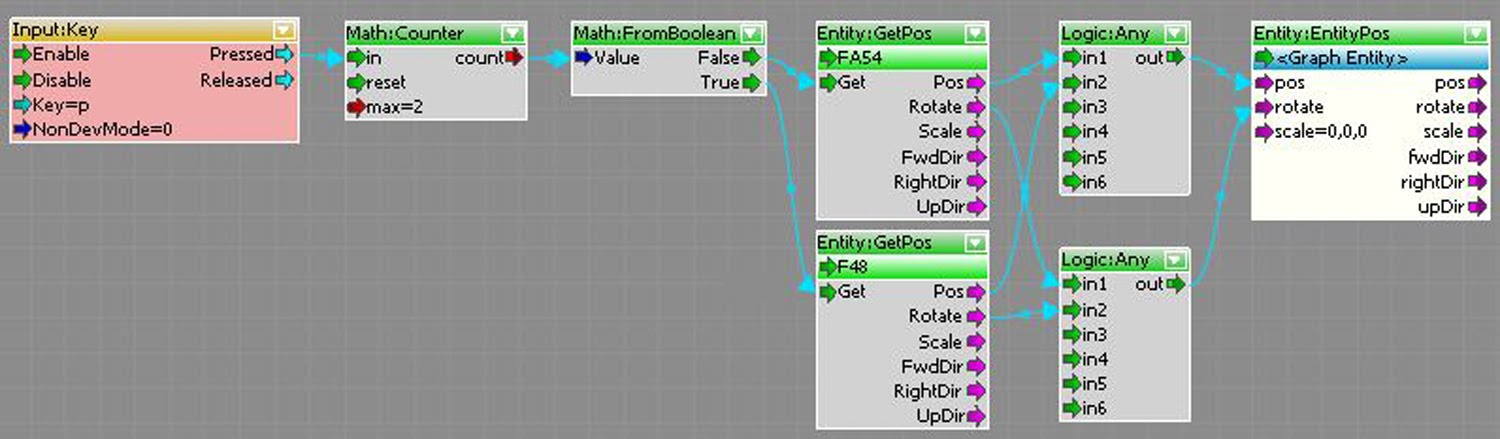
Through rigorous testing of this solution I further realised that as it was going to be impossible to have the local player walking normally vertically and upside as the faces rotate, rather the two opposite faces would rotate as a solution. However this meant the skeleton would become complex with now 17 children points. However through testing this solution it worked perfectly, in controlling the individual attachment of entities within faces. I even attempted to slightly alter the main attachment flow graph by placing a Entities: InRange node in the place of the mathematics to simplify it, however this failed so I kept with the original concept. Furthermore I was unable to get the mouse click plug-in working so I intend on researching other methods. I have included the two related flow graphs below in terms of the attachment control and the skeleton movement.


Skeleton Movement


Attachment and Detachment Management

EXP 2: Mastery Three – Entity:GetPos


Note: Recommended to view in 1080p HD.

Within the third mastery demonstration video of experiment two regarding the flow graph node “Entity: GetPos” my intent was to portray its ability regarding the calculation of numerous positions for future applications of management. This has been achieved through the attachment notion of an invisible skeleton which moves around the parameter of the main cube, comparing two values to determine whether an entity is in range and required to be attached. Such is portrayed through the first half of the video, as although the rotational attachments may appear simple, upon each new revolution the invisible skeleton is checking each of the 24 surrounding cubes to determine which entities to attach to the central rotation point cube. Furthermore to enhance this, I have included within the second half of the video, the movement of the skeleton with cubes at the end placements of the ‘children’s’ arms. This collaboration truly portrays the true mastery of this node as it is being used not only by itself but rather as a much larger and more complexly involved process of management. The manner in which such is achieved is presented beneath.


The flow graph above controls the testing and attachment of entity’s with reference to the skeleton. A key input triggers the sourcing of the cubes and relative skeletons cubes position, subtracting them before checking to see whether the resultant is less than one unit, if true it attaches, if false it doesn’t.


This flow graph controls the movement of the invisible skeleton. A key input triggers a math counter to compare the current and desired position and rotation of the parent entity of the skeleton through Entity: GetPos nodes, adjusting the current to the desired position and rotation.

Saturday, October 30, 2010

EXP 2: Mastery Two – Entity:EntityPos


Note: Recommended to view at 1080p HD.

The mastery video demonstration beneath portrays the use of the Entity:EntityPos flow graph node to calculate the local players world co-ordinates to effectively define the rotation of numerous individual entities which are attached to central point cube. Through the use of an addition control system within the flow graph one is able to control the rotational axis as which the local player’s position influences. Such enables one to accurately control the rotational angle upon a single axis rather than upon all three. Furthermore one is able define the sensitivity of the rotation in relation to the local players movement upon each individual axis separately. The manner in which this is all achieved is portrayed beneath.

The following flow graph consists of three similar components with simply different values. The local player’s position if compared to the position of the rotation point cube, before the resultant is split into individual axis, and changed, upon when it is then multiplied by a set value for each axis. The resultant is run through logic gate, to check to see whether it is too be run depending upon a key input, if so the entity’s rotational value is altered accordingly. If not, the operation is stoped.

EXP 2: Mastery One – Entity:AttachChild


Note: Recommended to view at 1080p HD.
Within the mastery video above regarding the “Entity:AttachChild” node my intention was to portray the possibilities in the attachment and detachment of numerous individual entities, conveyed through the use of rotation. In total there are 24 individual cubes which surround a centre rotational point cube upon each layer, which are completely independent of each other, thus through the use of the defined flow graph node one is able to attach them individually yet simultaneously to the rotational point. The manner in which the attachment and detachment is managed as well as the rotational mechanism is presented beneath.

The flow graph above uses a key input to trigger the attachment of the child (graph entity) to the parent (basic entity 3) when held, and upon release to detach the child (graph entity).

The following flow graph uses a key input to add a single degree to the rotation of the graph entity’s position each frame until it reaches 360.

Friday, October 29, 2010

EXP 2: Week 6: Tutorial Draft Video - Version One


The draft video tutorial above presents the general presentation mechanism I wish to use regarding the use of slides to enhance the video content. The overall video will be broken down into individual stages, and further more into individual steps which will be first outlined before then being demonstrated. Further I have decided to include all the flow graphs used within the tutorial upon slides at the beginning of the video which the responder will be able to screen shot and save for later use. Finally I have decided to create the video in HD to avoid the annoyance of watching a tutorial and not being able to identify what the person is clicking and selecting.

EXP 2: Week 6: Interconnection of Custom Textures and Forms

Through the further development of my data representation concept within experiment two I have produced three custom textures to be placed upon the custom installation. To further develop the notion of using the data in a manner that the protagonist is able to directly interact with. I have chosen to focus upon the statistics regarding the general number of men, women and youth suffering with depression in Australia. I have therefore created very simplistic textures which represents each of them, dispersing them over my custom instillations 26 individual components with reference to the statistical data. Thus the individual components of the station and installation work as a three dimension point graph perhaps of the data which the protagonist and hence responder engages with, as one moves through the environment, portrayed through the porosity lens documentary. This notion of dispersing the data is able to be presented through the diagram below.


The image below presents the three custom textures I have decided to use. Although they are very simple, outlining the first letter of each category, that are recognisable to all in terms of their purpose. Such is what I was attempting to achieve as I did not want complex textures that the responder needed to ponder in order to gain the meaning of it and its purpose within the overall project and thus the documentary. Due to the quick nature at which the scenes will transition within my documentary this was critically as the textures needed to be recognisable instantly.